Tag Archives: home decor

Square lampshade redo

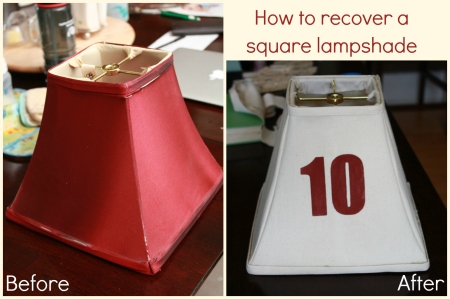
In my quest to finish my little man’s big boy room, I decided to add a few more projects to the list.  One was a new lamp that was more fitting with the rest of the room.  This idea started when I saw this lamp shade at a thrift store for $3 and a recollection of the 20,000  tutorials to recover a lampshade. Interestingly I never found a tutorial for a square lampshade, so here’s my stab at it!
While I pulled some ideas from a few of them, I followed the tutorial from shanty 2 chic the most.

I started by cutting down a seam and then carefully removing the outside layer of fabric (Keep the liner on). Try to keep the fabric all in one piece as that will be your template for your new fabric.  Good thing I read the tutorial before attempting this, because I’m totally that girl who just rips everything apart and then tries to figure it out later.  You’ll end up with just the lampshade skeleton

Because my lampshade was square, and my fabric didn’t have much give to it.  I ended up cutting 4 pieces and sewing the edges together.  This was different from all the other tutorials I had seen. I added 1/2″ of extra fabric all around my previous fabric template before cutting it out. Then just ran a stitch connecting all 4 sides. I trimmed the excess fabric off about a 1/4″ from the seam to make it less bulky and allow it to look more smooth.

Place the new fabric over your lampshade skeleton. (sorry for the bad lighting.  Some project are done best at midnight!)

I used my cameo to add an acrylic barn red-painted stencil of the number “10” to coordinate with my little man’s decor and vintage car theme. I was afraid that it would have been too hard to paint this once the fabric was on the lampshade, so I chose to do it before.  I don’t know if I would bother doing it that way again.

I placed the new lampshade over the skeleton.  Using E-6000 and clothespins I stretched the fabric, glued with e-6000 and held in place with clothespins.  Oh I should mention that I cut all the corners at a diagonal (essentially cutting the bottom corner off) to make the fold over and gluing much easier and again to make sure it laid smoothly on the lamp shade.  I clipped the top of one side with clothespins to hold it in place, then glued and clipped the bottom.  I did each side then waited a few minutes before moving to the next side.  I did all 4 sides on the bottom of the lamp shade before tackling the top.

To finish it off I added my own DIY bias tape to the top and bottom of the shade using excess fabric cut into strips long enough to wrap around the bottom and top of your shade.  Fold over a side and iron, then fold over the other side iron.  Wrap around the bottom of the shade and use e-6000 to glue on.

This little project inspired me to make my own lamp, and night stand too.  Stay tuned, you might even see little man’s vintage care themed bedroom reveal yet this summer?!

1 Comment

Filed under Before/After, DIY Projects, Gift of Thrift, Tutorials

How to decorate with Red, White & Blue

In honor of America’s birthday, I thought I’d be a little festive. The vignettes are easy and fun, however the above the cupboard space always proves to be more challenging than you think. I thought I’d share some tips and tricks on how to decorate these spaces with simplicity using art principles and a whole lot of thrift! (Sorry if that isn’t grammatically correct, it’s a phrase commonly used in my neck of the woods)

Side table Vignette: Just a touch of Red, White and Blue and chalkboard word art with some from the Star-Spangled banner to take the stage.

I free-handed the phrase with the help of some old-fashion white chalk and one of my many repurposed picture frames turn chalk board.

Add some country garland, a metal canister on one side (courtesy of IKEA) and a Vintage Blue Bottle on the other and we have ourselves a simple table vignette to celebrate America.

Above the cupboards {Grr, insert frustration here}.  When we bought this house I loved the idea of having the space above the cupboard to decorate for the seasons.  Sometimes I wish I could just leave the same decor up year round, but I simply can’t.  It bothers me to walk into our house and see the same old thing all the time.  It’s like a bad habit, with every change in season I struggle over how to change it up.  There is almost 3 feet of space to deal with, keep in mind the top of cupboards with trim covers nearly 4 inches of the bottom. This means I need to find ways to prop things up with 2 x 4 remnants, and also make sure to include big stuff.  The name of the game, I’ve learned,  is layers and angles.

I used to be into store bought decor, hence the FREEDOM word art from Hobby Lobby.  I have since tried to use only repurposed items and be a little more creative in my decorating to make or reuse items in a different way. The 7-Up crate you have or will see in 42 other pictures.  I use it ALL THE TIME ( sorry didn’t mean to yell, I just really love my old crates).  The candles were a DIY project from my Christmas Collection of projects. The flag pillow was a rummage sale item for 25 cents and the grapevine was cut several years ago from my parents back yard and has been used in various locations including the swag above our wedding arbor. Notice the layers of items overlapping, this help create more contrast and depth to the decor making it more appealing to the eye.  The grapevine acts as a filler without taking over the decor.

It’s also hard to get pictures of “Above the Cupboard decor” so bear with these next couple shots.  From this angle you can see the angles that I used to add some depth and provide focal points.  The angled stars in either corner (3 for a $1 at rummage sale) help draw your eye to the center.  The square red tin behind the lone little start stand help create some contrast and make the little star POP out.  The dark blue bowl (another $1 rummage sale find) grounds the decor with a different height from the other pieces.  Now a straighter but darker image

ALthough it’s challenging space to work with, using  pieces of various sizes and providing some layers of texture and angles for depth you can easily pull together an Above the Cupboard space to honor America 🙂

Linking these parties:
The Kurtz Corner, Home Stories A to Z, Not Just a Housewife, Elizabeth & Co, The Salt Tree


Leave a comment

Filed under DIY Projects, Gift of Thrift, Repurpose

Spring Fever!

Based on the weather in Wisconsin, you’d think we bypassed Spring and went straight to summer.  We’ve had 80 degree days in March.  We have literally spent every free minute outside playing and working knowing that, in Wisconsin, there is always a snow storm lingering around the corner.  All this fun in the sun (hard to believe I’m saying this in March) really took my attention away from the decor inside the home.   The evergreens just weren’t the right green for St. Patrick’s day, especially when it was 80 degrees.  If snowmen could talk, I would’ve had quite the scolding from my display.  I quickly decided something needed to be done. I scavanged through my supply of thrift shop stuff, and craft supplies and managed to pull together some fun decor more appropriate for the season!

I present the Spring Buffet (my version of the seasonal mantle)

Being that we’re expecting our little girl on Easter you could say I’m “nesting” with all this Spring fever….hahaha.  I know, that was lame!

Leave a comment

Filed under DIY Projects, Inspiration

Little Man’s Room gets a big boy makeover- Step 1

This is just the beginning process, but I’m so excited I can’t wait for a full room reveal.

My little man’s room was pretty neutral as a nursery, but as we are preparing for the arrival of number 2 we thought we’d change things up a bit.  Here was the nursery prior to his arrival in 2010.

Pretty simple. Striped off-white walls with pops of color.  Some home-made wall art, curtains and the dresser/changing table my husband made was about all the personality we added to the room.  For my son’s baptism his uber amazing godmother got him this “100 Wishes” quilt.

I am using this quilt to inspire the color and feel to the big boy atmosphere, in addition to a pseudo-headboard (minus the board).  So, we selected a steel-blue to paint 3 of the walls (similar to the blue border closest to the words, framed by the orange). Here’s a glimpse of the painted wall color (Please accept my apology for the lack of staging in this post, quickly stole pictures during daylight and between nap times)

Okay- nice, but to me just painting is boring. My most FAVORITE part is what we did to the window wall.  I’m sure you’ve seen an abundance of old wood re-used for various purposes.  Well, it turns out my dad had some available barn boards from a shed that he was remodeling…are the wheels churning?!?!

You got it.  We took out all the old nails and sided the window wall with old barn boards.  I was going to wax the boards to make them more smooth but it took too much texture and color out of the wood.  Instead my husband just took a rag wiped it down to get all the big snaggy-pieces off (of course snaggy-pieces is a word), and then went over some rough spots with a REALLY fine sandpaper. We put them in my husband’s shop for about a week to make sure they were completely dried out (preventing mold & mildew between the boards and wall is kind of important).  In terms of tools and supplies we used: 6 – 8ft barn boards (1 x 6), air compressor, nail gun, finishing nails, saw (compound miter saw), level, tape measure, hammer, step stool pencil and paper. He started by attaching a full board to the biggest space on the wall.  Since the dimensions of the wall are about 12′ wide by 9′ high and includes a large window, he only used one full board on the wall.


After that it was just a matter of measuring, cutting and nailing them to the wall.  He used a nail gun and finishing nails so you can’t even see the nails, unless you know to look for them.  Truthfully, the most time consuming part was cutting the boards to the perfect size to fit all the puzzle pieces together. The trickiest part was preventing the boards from splitting when cutting them to fit.  The wood is old and dried, which can lead to some challenges…so plan to have extra boards available.

Another consideration was the pattern that he created.  While he could have put all boards of equal size on either side of the window, I wanted some variety in the layout.   He cut several small pieces from different boards so the color and texture wasn’t the same throughout the wall.   You might notice the variety in color from greys to reds in this next picture.  You’ll also see the intentional seams he created to add some variety to the overall pattern.  What you probably can’t see from these pictures, are that the barn boards are the same thickness as our white trim, so the wall is now flush with the trim.


Even my little man got in on the fun!  (No worries all safety features were on and the air compressor was disconnected making it impossible for him to accidentally shoot any nails- I checked 37 times).

There is so much more coming- stay tuned.  In the meantime, don’t mind me while I stop and stare at the wall every moment and smile.  Exactly the look I wanted…Exactly 🙂

I know this isn’t as detailed as my usual tutorials, but feel free to ask questions. I’d be more than willing to elaborate if you need more information!

Linking to:

House of Hepworths
Fireflies & Jellybeans
Lovely Crafty Home
Miss Mustard Seed
Funky Junk Interiors
Sisters of the Wild West

DIY ClubSomewhat Simple

12 Comments

Filed under Before/After, DIY Projects, Inspiration

Scrap Fabric Tree

I’m going to apologize in advance for 2 things.
1. The lack of pictures in this post.
2.  The quality of lighting in most of my posts.
I’m a crafty mom who works Full-time and lives in Wisconsin. The daylight hours are 6:30 AM to 4:45 PM, hence all nice natural light is consumed while I’m at work.  And since I do most of my crafting, decorating, and “pretty stuff” between the hours of 8-11 PM, there are few options for good pictures.

I digress.  This seriously was a “Hmm, what could I do with these scraps” kind of project.  Grab a glue gun and styrofoam cone and you have yourself a Scrap Fabric Tree

Simply cut fabric into strips about 3/4″-1″ wide by about 2.5″ long.  Randomly hot glue them to the styrofoam cone.  Keep layering until the cone is no longer visible.  To get the flimsy look only attach a part of the fabric strip and leave some of it loose.  The idea is to be “intentionally random” in appearance.  How’s that for decor lingo.  The hardest part of this project is to not burn your fingers and then pulling off all the hot glue webs everywhere.

I placed my little tree on top of my kitchen cupboards for a little country red vignette.

To learn more about the decoupaged candles check out this post.  For more on tiered vases and displays, stay tuned to the

where many more ornaments, recipes, gifts and ideas will be shared until Christmas.

Linking to :

Home Stories A2Z

1 Comment

Filed under DIY Projects, Inspiration

I’m dreaming of a White Christmas {Candlestick accents}

That title isn’t cliche- I LOVE snow and the color white.  There is just something so elegant and magical about white with touches of pine boughs.  You may recall my mantel display where I became obsessed with my new-ish white Nativity set from a garage sale…let me remind you!

So throughout my house this year I’ve been a bit stuck on the idea of white accents.  Hence the next project,  Thrift Store Candlestick Makeover!

I’ve been empowered this past year by the power of spray paint.  I’d be remiss to not share my affection for Rustoleum Heirloom White spray paint.  Since our introduction this summer I have found a thousand and seven things that get a complete facelift with a few little shots of heirloom white love and 10 minutes of my time.  The fact that I’m a complete cheap skate might have something to do with it too.

When I met completely-out-dated-yellow-flower-candlesticks at goodwill for 99 cents for the pair, I somehow visioned a future much more fulfilling with them in my house.  A few coats of Rustoleum paint and they have been born again. I like them so much that I have used them for everything except candle holders (yet).  They are some how adequate all by their lonesome.

Add a few red ball christmas ornaments and they become the best end table accents for my living room 🙂

If you haven’t been following Fostering a creative Life, you may want to check it out for lots of homemade ideas for the Countdown to Christmas Series 🙂

This project is being shared at:
Domestically Speaking

Leave a comment

Filed under DIY Projects, Gift of Thrift, Inspiration

Christmas Mantel

disclaimer: My mantel was actually the buffet in my dining room for several years.  Now that I actually have a mantel in the basement I can’t give up my buffet for seasonal vignettes of decor. Also note that I’m not QUITE finished with this one yet as I have a few more “real” natural elements to add to complete the look.

Each year I try to have a theme to my mantel.  I had an image nagging in my mind of this Christmas Mantel from Just a Girl posted last year.

recognize that wreath?  I love the white with the greenery- festive but simple.

While at a garage sale this summer I happened upon an all white nativity set and I fell in love with it.  It would set the stage for this simple yet focal point in my holiday decor.  My dining room is the gathering place in our house and I often look for a way to tell a story through my decor.  This nativity set was just the focal point I was looking for to keep the reason for the season in the forfront of our holiday celebrations.

I added a burlap scrap to act as the hay and stable area, and an antique wooden box as the stable.

I added some garland behind the scene to make the figures stand out more.  I am also adding some pine boughs to the metal tins and some dogwood branches and twigs to the garland to add a more natural look to it.

I know what your thinking…um Heidi, this looks nothing like your inspiration mantle from Just a Girl.  If you can appreciate the natural, simple look of garland with white accents you’ll understand just how my brain operates!

3 Comments

Filed under DIY Projects, Gift of Thrift, Inspiration

Light up the Holidays {accessorize your candles}

Here’s a fun way to spruce up some simple dollar candles into something brighter for the holidays.

Grab some plain old boring candles and an assortment of pretty paper, old book pages, sheet music, fabric, what-ever fits your fancy. Then throw in some fun twine, ribbon or wire and maybe a few random embellishments.  Spread a bit of Modge Podge onto your candle with a foam brush.

Place the paper or fabric over the Modge Podge and smooth out with the foam brush.  For some papers you’ll want to add a layer of modge podge over the top and sides of paper to smooth it out.
Then take your ribbon, twine, or what ever else you have in mind and wrap over the paper and tie it.  For some of the heavier wire I wrapped it, then also added a few dots of E-6000 or another strong adhesive that would encourage it to stay put.

Display proudly.  Nothing light a winter evening lit by candles with the soft hum of Silent Night playing in the background!

4 Comments

Filed under DIY Projects, Gift of Thrift, Inspiration, Tutorials

Comfort & Joy {DIY Holiday Sign}

Let’s just start this series by saying I love Christmas and Winter. Full confession being made, I also LOVE to surround myself with reminders of the holiday spirit.  This first project is a super simple sign using an old picture frame, fabric, cardstock paper, and die-cut letters and shapes (or stencils work too).

1. Find a Frame (this is a $1 thrift store 8×10 frame)

2.  Find a scrap of fabric that fits the mood of your decor.  If you’re lacking fabric scraps, hit up the remnant section of your local craft/fabric store. Use the cardboard back from the frame as your guide for cutting.  I leave about 1/4 inch extra all the way around to make sure it’s not too short.

3.  Choose your saying and cut it out of cardstock.

4. Display the cardstock words on the fabric.  Place the glass from the frame over the fabric and word.  Holding the glass and fabric tightly flip over the glass into the back of the frame.  Secure the cardboard back of the frame and secure tightly.

That’s it!  Display proudly.Very little mess to clean up, no glue, no glitter…super simple sign 🙂

Come back tomorrow ( and for the next month) for more Homemade Holiday ideas as Fostering a creative Life hosts the…

Linking to:

Home Stories A2Z

Leave a comment

Filed under DIY Projects, Gift of Thrift, Inspiration