Category Archives: Gift of Thrift

Square lampshade redo

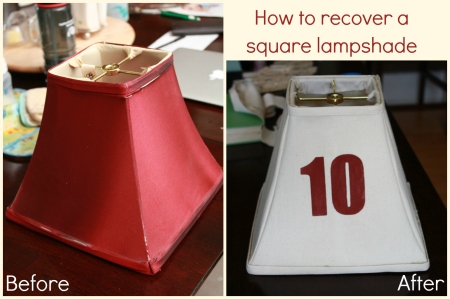
In my quest to finish my little man’s big boy room, I decided to add a few more projects to the list.  One was a new lamp that was more fitting with the rest of the room.  This idea started when I saw this lamp shade at a thrift store for $3 and a recollection of the 20,000  tutorials to recover a lampshade. Interestingly I never found a tutorial for a square lampshade, so here’s my stab at it!
While I pulled some ideas from a few of them, I followed the tutorial from shanty 2 chic the most.

I started by cutting down a seam and then carefully removing the outside layer of fabric (Keep the liner on). Try to keep the fabric all in one piece as that will be your template for your new fabric.  Good thing I read the tutorial before attempting this, because I’m totally that girl who just rips everything apart and then tries to figure it out later.  You’ll end up with just the lampshade skeleton

Because my lampshade was square, and my fabric didn’t have much give to it.  I ended up cutting 4 pieces and sewing the edges together.  This was different from all the other tutorials I had seen. I added 1/2″ of extra fabric all around my previous fabric template before cutting it out. Then just ran a stitch connecting all 4 sides. I trimmed the excess fabric off about a 1/4″ from the seam to make it less bulky and allow it to look more smooth.

Place the new fabric over your lampshade skeleton. (sorry for the bad lighting.  Some project are done best at midnight!)

I used my cameo to add an acrylic barn red-painted stencil of the number “10” to coordinate with my little man’s decor and vintage car theme. I was afraid that it would have been too hard to paint this once the fabric was on the lampshade, so I chose to do it before.  I don’t know if I would bother doing it that way again.

I placed the new lampshade over the skeleton.  Using E-6000 and clothespins I stretched the fabric, glued with e-6000 and held in place with clothespins.  Oh I should mention that I cut all the corners at a diagonal (essentially cutting the bottom corner off) to make the fold over and gluing much easier and again to make sure it laid smoothly on the lamp shade.  I clipped the top of one side with clothespins to hold it in place, then glued and clipped the bottom.  I did each side then waited a few minutes before moving to the next side.  I did all 4 sides on the bottom of the lamp shade before tackling the top.

To finish it off I added my own DIY bias tape to the top and bottom of the shade using excess fabric cut into strips long enough to wrap around the bottom and top of your shade.  Fold over a side and iron, then fold over the other side iron.  Wrap around the bottom of the shade and use e-6000 to glue on.

This little project inspired me to make my own lamp, and night stand too.  Stay tuned, you might even see little man’s vintage care themed bedroom reveal yet this summer?!

1 Comment

Filed under Before/After, DIY Projects, Gift of Thrift, Tutorials

How to decorate with Red, White & Blue

In honor of America’s birthday, I thought I’d be a little festive. The vignettes are easy and fun, however the above the cupboard space always proves to be more challenging than you think. I thought I’d share some tips and tricks on how to decorate these spaces with simplicity using art principles and a whole lot of thrift! (Sorry if that isn’t grammatically correct, it’s a phrase commonly used in my neck of the woods)

Side table Vignette: Just a touch of Red, White and Blue and chalkboard word art with some from the Star-Spangled banner to take the stage.

I free-handed the phrase with the help of some old-fashion white chalk and one of my many repurposed picture frames turn chalk board.

Add some country garland, a metal canister on one side (courtesy of IKEA) and a Vintage Blue Bottle on the other and we have ourselves a simple table vignette to celebrate America.

Above the cupboards {Grr, insert frustration here}.  When we bought this house I loved the idea of having the space above the cupboard to decorate for the seasons.  Sometimes I wish I could just leave the same decor up year round, but I simply can’t.  It bothers me to walk into our house and see the same old thing all the time.  It’s like a bad habit, with every change in season I struggle over how to change it up.  There is almost 3 feet of space to deal with, keep in mind the top of cupboards with trim covers nearly 4 inches of the bottom. This means I need to find ways to prop things up with 2 x 4 remnants, and also make sure to include big stuff.  The name of the game, I’ve learned,  is layers and angles.

I used to be into store bought decor, hence the FREEDOM word art from Hobby Lobby.  I have since tried to use only repurposed items and be a little more creative in my decorating to make or reuse items in a different way. The 7-Up crate you have or will see in 42 other pictures.  I use it ALL THE TIME ( sorry didn’t mean to yell, I just really love my old crates).  The candles were a DIY project from my Christmas Collection of projects. The flag pillow was a rummage sale item for 25 cents and the grapevine was cut several years ago from my parents back yard and has been used in various locations including the swag above our wedding arbor. Notice the layers of items overlapping, this help create more contrast and depth to the decor making it more appealing to the eye.  The grapevine acts as a filler without taking over the decor.

It’s also hard to get pictures of “Above the Cupboard decor” so bear with these next couple shots.  From this angle you can see the angles that I used to add some depth and provide focal points.  The angled stars in either corner (3 for a $1 at rummage sale) help draw your eye to the center.  The square red tin behind the lone little start stand help create some contrast and make the little star POP out.  The dark blue bowl (another $1 rummage sale find) grounds the decor with a different height from the other pieces.  Now a straighter but darker image

ALthough it’s challenging space to work with, using  pieces of various sizes and providing some layers of texture and angles for depth you can easily pull together an Above the Cupboard space to honor America 🙂

Linking these parties:
The Kurtz Corner, Home Stories A to Z, Not Just a Housewife, Elizabeth & Co, The Salt Tree


Leave a comment

Filed under DIY Projects, Gift of Thrift, Repurpose

Sew Scary {repurposed wedding dress}

I remember on my wedding night a good friend came up to me at the reception and said “I LOVE your dress, it would be a beautiful baptismal gown” and that little seed was all I needed.  I knew that my wedding dress was not going to get “preserved” in a box.  But after our wedding night, I balled it up and threw (GASP– right?) it in a bag.  A few months later I  took it out of the bag and hung it up in my closet.  About 2 months ago, I thought it was about time to jump into this project before it was too late.  Since I hadn’t even had it cleaned, I did some research on how to do it myself.  (For a tutorial on how to clean your own wedding dress without the hefty price tag go here).  I decided it was time.

I should share a little story here.  I have always been a thrifty girl and our wedding was no different.  I bought my wedding dress from China for $20, I sent my measurements and it was made to fit me (not suggesting that I endorse 3rd world sweatshops, so be nice).  With shipping and some minor alterations it came to about $200.  (For more on some thrifty ideas from our DIY wedding go here).  I have a hard time thinking my daughter would wear my dress when she got older.  Who knew I’d even have a daughter. Who knows what the style would be in 20+ years, not to mention that I’d hate to impose my dress on my daughter for her wedding. Before I cut up my dress, I did remember to grab a few pictures of it (don’t mind that it was at work in the hallway).

Back of dress:

(the lighting wasn’t ideal, so I did some editing to this picture to help bring out the details a bit more)

Front:

Front of dress details:

Details of the train:

Thankfully I have a friend is a much more reliable sewer than I, who was willing to help a friend in need.  She had a basic pattern (that we modified of course) to help us piece together the gown.  Here’s a few pictures of the “during” process from wedding gown to baptismal gown. The first cut wasn’t as scary as the first attempt to sew a hem.  Seriously my palms were sweating.

Today my wedding dress shares space between a pile of remaining fabric in a bag for something amazing in the future (not sure what that will be yet) and my daughter’s baptismal gown.

Despite my fear of sewing, I am very excited about how this turned out.  While I tend to be the adventurous type, chopping up my wedding dress isn’t something that I do everyday, so I wanted to make sure every tidbit of fabric was used purposefully.

So there you have it.  I challenged myself to tackle one scary thing, and am overjoyed with the results.  I hope this gown will be one I can hand down to my grandchildren some day to keep the material items from our wedding alive for years to come.

Oh yes, my daughter in her baptismal gown…sure thing 🙂
Little-d-Tales: EllaMae 3 MO. &emdash;
Linking to:

Funky Junk Interiors, Home Stories A to Z, Sugar Bee Crafts, Not Just a Housewife, Todays Creative blog, Sew Chatty,  Best DIY project of 2012

9 Comments

Filed under Before/After, DIY Projects, Gift of Thrift, Repurpose, sewing

Preserve your wedding gown on the cheap {DIY}

Your wedding gown is often revered as a prized possession that many women dream of and then cherish forever.  Thus the bridal industry has found ways to scam thousands of dollars from hopeless romantics to make every details of your wedding a huge budget breaker. I found ways to rebel against the industry and make my wedding a gorgeous day without breaking the bank (For a series of DIY thrifty wedding ideas go here).  Four years later, I’m still finding ways to save money on my wedding.

I did the unthinkable after our wedding, as do many brides.  The day is over and you hang your dress up in your closet with every intention of cleaning it or selling it, or deciding what to do with it, and end up totally forgetting about it.  Four years later you pull it out to create something wonderful (stay tuned) and realize that there are a few stains and spots on your dress.  Eeek, will they come out? Well thanks to google I found a few ways to keep my cleaning expenses down by doing it myself.

My dress was made mostly from satin with a sheer overlay with embroidery.  Here’s a few pictures of the dress for your reference

As you can see the train was sheer with embroidery around the bottom and up the back.  Here’s a close up of the bottom of the sheer layer

The bodice had some beadwork

I did my research and talked with a few friends.  One friend used to work at a dry-cleaners where she said 90% of all wedding dresses can be turned inside out and put in the washer on delicate.  I also had read about some techniques to get stains out of different fabrics.  Here is an article I read and followed most of their suggestions.  Based on my inspection of the dress, most of the “dirtiness” was on the bottom hem of the train.  As they say wedding dress trains act like dry mops, and mine was no exception.

I started by hanging my dress from a hanger into the bathtub.  I filled the bathtub with warm sudsy water.  I took a mild brush and went around the hem doing some spot scrubbing to get the dirt out.  I then drained and rinsed with clean cool water and let hang to dry for at least 24 hours.  When it was completely dry I inspected again.  I actually used some watered down stain removers on several spots.  I used both Shout and OxyClean.  (Make sure to test on an area the won’t be very noticeable incase they aren’t meant for your fabric).   Again apply the watered down spot remover to stains with a gentle scrub brush, or tooth-brush.

Then I did exactly as my friend suggested (Most of my dress was made from polyester based fabric), I turned my dress inside out to prevent any beads or delicate lace from catching, and placed into our front load washer.  I used a gentle detergent and placed on delicate.  To dry I hung in the bathtub for another 24-48 hours to make sure it was fully dry.

I repurposed my dress into something wonderful (stay tuned), but I have also read that if you want to preserve it, it’s best to use white tissue paper or anything that will not leave an acidic residue on the fabric.

As you can see from the pictures above, it cleaned everything pretty well.  Was it 100% perfect, no but it was about 90% better and saved me almost $200 in cleaning.

Linking to:
Bowl full of Lemons ( I never thought I’d link up to a cleaning category, but I guess there is a first for everything!)

2 Comments

Filed under DIY Projects, Gift of Thrift, Tutorials

Tulle flower tutorial {Sewing}

In an effort to add some accessories to the tulle ruffle skirt, I decided to create a few tulle flowers.  One I sewed directly to the onesie that is worn with the skirt, and a few others have made their way onto headbands.

To begin, cut strips of tulle (mine were 4″ by 12″).  Fold in half a couple of times lengthwise to add some fullness to the tulle.  Then run a straight stitch right down the center of your folds.

Gather the tulle by tightly in the middle by pulling one of the threads on both ends.  (For a more detailed tutorial on this see my ruffled skirt post).

Then cut a small circle from felt (ideally the same color as the fabric you intend to attach it to).

Using the gathered tulle, wrap around in a circle and place on the felt in a circle.  I went around the outside first and had 3-4 more rounds of tulle to work inwards.  I placed one pin through the middle of the tulle and felt just to hold in place.  Then hand sew the felt to the tulle, making sure to only go through one layer of the flower at a time (Otherwise you get a flattened flower look).  I apologize there isn’t a picture of this, I simply didn’t have enough hands when I was doing this!

Finally hand sew (or use fabric glue) to attach the felt to the fabric of your choice!

These are really cute with a layer of satin or other festive fabric too!


1 Comment

Filed under DIY Projects, Gift of Thrift, Tutorials

Ruffle newborn skirt tutorial {Sewing}

If you read my Lesson in Recovery, you may be aware of my desire to sew, but fear in inadequacy.  I have since been practicing and stepped it up a notch to make my first little girl outfit.

The inspiration for this outfit came from a sales rack at Babies R’ Us where I saw an adorable ruffly dress sewn to a onesie.  With a sale price tag of $17 I knew I could create something just as cute with the fabric I had.  Of course I can’t find a picture of the original dress, but here is something similar that was available online with a price tag of $34.00 at Rufflebutts.com

I did pick up a 1/2 yard of white satin fabric (at 40% off of course) for $3.00 to make this, the rest of it I had. Thanks to the help of my friend who is helping me convert my wedding dress to a baptismal gown, I learned the art of gathers, which I prefer to call “puckers.” So I used that skill and a few different colors of tulle to make a little tulle ruffled satin skirt for my newbie.

I apologize for my lack of pictures in this post, I got a little caught up in making it that I forgot about capturing the process.  If you have questions, feel free to comment below and I’ll do my best to walk you through the steps 🙂

To begin I cut 6 strips of tulle, 6 inches wide by 16 inches long. The length should be about double the width of the skirt.  Then fold the tulle strips in half and in half again so I had a double thick fabric to create fuller ruffles.  Then I ran a straight stitch down the center of my double thick tulle strip.

Make sure to keep your threads long on either end of the stitch.  You will not see this stitch, so don’t worry if it’s not straight.  It just needs to go through all of the layers.  If you have some really uneven edges, take a scissors and trimmed them in line with the others to make it a little cleaner looking.

Next on both ends of the tulle take one of the threads and pull, gathering the tulle toward the middle.  Make sure to do it evenly on both sides.  On my skirt the gathered tulle strips needed to be about 8 inches long.

For the base of the skirt I used white satin so it would be soft and smooth on my newborn’s skin, but most knit fabrics would work too.  I cut the satin into  two 8″ x  8″ pieces  Because satin is a fabric that frays very easily,  I ran a 1/2 straight stitch hem along the side edges just to prevent the edges from fraying while I was working on it.  On the top and bottom I ran a 5/8″  straight stitch to prevent fraying.  Then I folded over and pinned for a 1/4″ hem.  I should note that since this was a newborn skirt I was simply attaching the skirt to a onesie, so I didn’t need to add an elastic waistband.  If you plan to do so, you’d want to make sure to add a channel and run the elastic through the waist line too.

Now the fun part.  Take all those gathered tulle strip and pin them onto the skirt. You’ll want to make sure the gathers are somewhat even or all your ruffles will be to one side. (I took this picture before I decided against the brown, same process though).  I pinned the ruffles with my pins pointing up and down so that I can sew over them rather than pulling the pins. It helps to make sure everything stays in place.

Over each strip your going to run a straight stitch hem, with back-stitch, directly over the first straight stitch in the tulle to adhere it to the skirt.

The final piece is to turn the skirt inside out so rights sides are facing together.  Pin an angled side seam to create the skirt. I used a zigzag stitch on the side seam.  Then trim down the edges (about 1/4″ to 1/2 inch from the seam) and turn right sides out.

Because I wanted my accessorized onesie to be used with other outfits, I hand-sewed snaps to attach it to the inside of the skirt.

And there you have it.  Stay tuned for another tutorial on creating ruffle tulle flowers and accessories. Granted my time is invaluable, but this project cost me less than $8 and I have plenty of supplies remaining to make other fun girly stuff. In fact the tulle is still left over from our wedding!

1 Comment

Filed under DIY Projects, Gift of Thrift, Inspiration, Tutorials

DIY Baby Wipes on the Cheap

Being that I’m a new mom, baby wipes are used frequently in this house.  A friend gave me a gift basket with my first child with the ingredients and recipe to make my own baby wipes.  I decided to pull out that baby and make a few batches today.

Ingredients:
Roll of Paper towel
2 Cups of Water
2 Tablespoons of Baby Wash
2 Tablespoons of Baby oil (or olive oil works well too)

Begin by finding a container to fit the diameter of the paper towel roll (this might be the hardest part of this project).  Cut the paper towel roll in half using a non-serrated knife.  A serrated knife kind of mangled the paper towel, but it was all I could find when I was ready to make these.  You can see the mess it makes.

Place one of the cut paper towel rolls into the container and add the remaining ingredients.  Let set until the roll has absorbed the liquids.  Remove the cardboard tube from the center.  Pull the wipes from the center of the roll for use.

Turns out one roll of paper towel (which is about a $1/roll or less if you buy in bulk) makes about 400 wipes.  The oil and baby wash are about $2-$3 each, but with only 2 Tablespoons per batch you can make quite a few baby wipes with each container.  Best yet the wipes are super soft without any chemicals on your baby’s bum!

Leave a comment

Filed under DIY Projects, Gift of Thrift, Tutorials

Cupboard Wall Art

I have a knack for transforming other peoples junk into something creative.  One of my recent projects was transforming some cupboard doors and drawer fronts into wall art.

Like this “Blesssed” sign behind my 30 week belly

Or this Cupboard door “Simplify” sign atop my kitchen cupboards at Christmas time.

My newest is this cupboard door, painted robin egg blue (free paint from Habitat ReStore) but I’m struggling with what to put on it?!

Any suggestions?!?! By the way, if you are looking for cupboard doors or drawers, Habitat ReStore is an excellent first stop!

Leave a comment

Filed under DIY Projects, Gift of Thrift

A Lesson in Recovery {Fabric}

I have some pretty high aspirations when it comes to fabric. Combine that with someone who has very little experience with sewing, or really anything with fabric, and you have one perplexed individual.  I see what other bloggers can do and I get all inspired, and then frustrated because I don’t have a clue.  Many of these little creative genius’ roaming the blog world are operating in a whole different league, we aren’t even in the same division! So this post is dedicated to tackling something that is very challenging for you!

I desperately want to tackle a upholstery project, but I just don’t feel very confident (this is pretty true about anything to do with sewing too).  But thanks to a few blogs I’ve read, when I saw this stool for $1 at an estate sale I knew that even I could make her pretty and functional….or at least attempt to.

I started by taking off the top fabric and pad simply by pulling the staples on the bottom.

Then I placed the old foam on a new piece of foam.  Using a sharpie I traced around the old foam to make sure my new cushion was the right size.

I cut out the cushion with a rotary blade (shown above) because it is SO sharp and cuts much smoother than my attempt with a scissors and any other blade for that matter.  Once the new cushion was cut from the new foam I placed it on top of the stool frame, and laid my fabric over the top of the foam.  I took the entire stool (with foam and fabric on top) and flipped over on top of the table, and went to town with a staple gun.

Trim off the excess fabric, close to the staples.  Right side up she looked like this…

But to make her even more pretty, I pulled out some ribbon and glued it to the edge.

Mission accomplished.  Stool pretty-fied, and functional.
(Whoa, don’t look in the background.  My craft space is the porch of our house which has been doubling as “storage of stuff.”  Guess it’s time for some spring cleaning)

What projects have you done that were a little out of your comfort zone, but you are glad you did it?  Comment below and share a link if you can!

4 Comments

Filed under Before/After, Gift of Thrift, Tutorials

Spice rack book shelves {DIY}

There’s been quite a few posts about front facing book shelves.  Little Man’s big boy bedroom makeover (click these links to see phase 1 and phase 2) needed a little less clutter, and yet his books needed to be accessible by him (he’s 2). If you’ve ever read this blog before you know that cheap, trendy and figuring out how to “do-it-myself” is how I roll.

I was intrigued by the $3.99 IKEA spice racks made bookshelves…

…but being that the nearest IKEA is 4 hours away and these are not available for order, I needed to come up with a plan B.

So I showed the husband a picture, gave him some dimensions and about 4 hours later we were painting them red. He made 3 total, one for above the bed and 2 for the corner nook.

The husband has learned that I don’t throw scraps away.  (Yes, I just admitted to dumpster diving).  It proved to be handy as much of this was “scrap” wood that was left over from a previous project, the paint was left over from our “red room.”  So our total budget $0.00. On to some wall art and curtains and you might see a full bedroom reveal before the end of the year 😉

Linking to:
Home Stories A to Z
Sugar Bee Crafts
Not Just a Housewife

2 Comments

Filed under DIY Projects, Gift of Thrift, Handyman