Saturday inspired cupcakes

Last night at 11 PM I was in the cooking mood.  Inspired by the events of the weekend I opted to explore the idea of a Car Bomb cupcake.  On Friday night I celebrated my birthday with my family and my mom purchased some fancy, gourmet, pretty, over-priced cupcakes which leads me to Saturday, a festive night with a friend and our families which included an investigation to the contents of an Irish Car Bomb (which of course I had the answer right- guiness with 1/2 shot Jameson & 1/2 shot Bailey’s).  Sunday night I thought I’d compile the weekend events into something fabulous: a car bomb cupcake.

Disclaimer: I am about to share a recipe.  I borrowed from several.  BUT I don’t follow recipes all that well so this is my attempt to recreate what happened last night at 11:30 PM so that my friends and co-workers can find peace, and perhaps recreate the masterpiece they just swallowed.  Usually when I’m referencing a recipe I tend to just put all the ingredients into a bowl  in order, that is not how this recipe works.  So for those who are more like me than not, you’ll notice I bolded the ingredients within the recipe so you don’t make a mistake I likely would make!

Little-d-Tales: Fostering a Creative Life &emdash; carbomb cupcakes

Cupcake: Adopted from Brown-Eyed Baker
Turn on Oven to 350 degrees. Line 24 cupcake tins

Simmer 1 c. of Guiness beer with 3/4 C. of Cocoa (I used the regular Hershey’s cocoa).  Stir until blended together.
Note: Don’t taste this, it’s extremely bitter! Consider yourself warned.

Sperate Bowl: Blend  together with a hand mixer on med-low speed for 5 minutes. Continue to scrape the sides of the bowl, and continue mixing
1 C. room temperature butter
2 C. Flour,
2 C. White Sugar
1 1/2 teaspoon of baking soda

In a bigger (Seperate) Bowl: Whisk together
2 eggs and 1 C. Sour Cream (I was very close to subbing Vanilla yogurt?!)
slowly add the Guiness and cocoa mixture until smooth.
add the dough mixture and beat with the mixer on medium for several minutes.  The batter should get really creamy and fluffy consistency.  This does taste good.  Consider yourself warned!

Scoop into cupcakes (about 3/4 full) bake for 17 minutes or until toothpick test is clean.

Bailey’s Frosting
Cream 1 lb of room temperature butter (yes, 4 sticks! I was going to try subsisting cream cheese, but honestly I was to tired to figure that out by this point)
Add 6 T. of Bailey’s Irish Cream (use the cheap stuff, no one will REALLY know and for the price it’s really not worth satisfying the high class tastebuds)  Might as well take a pull off the bottle, there’s no judgement here!
Most frosting recipes call for powdered sugar, but frankly powdered sugar leaves a funky film in my mouth so I do half powdered sugar, and half white sugar.  I add sugar until it gets thick enough to decorate, creamy but not firm.  (I would guess this was about 4 Cups combined).

Add frosting to a frosting bag (or ziploc bag and cut the corner off)

After the cupcakes cool…It’s important they cool or the frosting melts and makes a mess! Put a frosting swirly on the cupcake.  If you choose to add a little sugar sprinkle or edible glitter to make it look fancy, let your heart flutter.

By this time you might be noticing that If this were a true carbomb there’d be Irish Whisky.  Well I don’t like whiskey and I can’t garauntee that my 3-year-old  and 11-month-old wouldn’t steal a bite, so I tried to lay low on the liquor!

Eat any that you screwed up.  There is really no need to leave evidence of imperfection.  Charge your friends $3 a cupcake and you just started yourself a new business…or take them all to work, liquor your colleagues up enough to make them like you and your ridiculous ideas! Or feed it to your husband for breakfast.  He’d reflect on the last time he had a beer and cupcake for breakfast which will make him smile (or potentially vomit in his mouth).

Hope you enjoy.  Have fun pretending your Irish.  If you feel the need to add green, put sugar on top.

Leave a comment

Filed under Uncategorized

Big Game Party ideas

I know in the crafting, home decor, DIY blog world I may not have the same interests as fellow bloggers….But I’m a HUGE football fan.  And while I’m loyal to the Green Bay Packers and am mildly devastated that they won’t be playing in the Superbowl, we have a little hometown hero action with the San Fran 49ers quarterback.  Did I mention I LOVE football.  So I’m posting a few fabulous football party ideas, some are mine, some are others that I aspire to be.

1. Football Field Party Tray
Little-d-Tales: Fostering a Creative Life &emdash;

Cover a slab of green craft foam with plastic wrap, load up the sausage and cheese football players, line the stands with chips and treats and we have ourselves an hor d’ourves football game!

2. Edible footballs
Little-d-Tales: Fostering a Creative Life &emdash;
Add some green onion laces to an existing fan favorite for a football inspired snack.  The green onion actually gives a hint of flavor, so make sure you don’t do it to soon before the party or you’ll have deviled onions not eggs! Along similar lines, cheese, crackers and sausage with ranch dressing laces.  Yum.

Source: gimmesomeoven.com via Heidi on Pinterest

Looking for something a bit sweeter…

Source: recipegirl.com via Heidi on Pinterest

3. Fancy Football table cloth

4. Looking for Tickets to the Game?

Source: joyababy.com via Heidi on Pinterest

5. How to welcome the opponent…with class of course!


Any other lingering ideas? I think it’s funny that all ideas that I found have Green & Gold. Coincidence? Maybe there are others with really good taste :).  Stay tuned for some amazing party recipes

Leave a comment

Filed under Uncategorized

Vintage Car Big Boy Bedroom Reveal

I can’t wait any longer.  There are a few lingering details that need to be added, but oh well. I want to share this RIGHT NOW.  My little man’s room needed to be transformed from the once gender neutral nursery, to a place he could call his own.
Little-d-Tales: Fostering a Creative Life &emdash; IMG_9504

Little-d-Tales: Fostering a Creative Life &emdash; IMG_9513
Little-d-Tales: Fostering a Creative Life &emdash; IMG_9526

We tried to create a space to fit his needs and my taste.  Hence VINTAGE (or at least retro) Cars.  Yes, He loves old stuff and I’m a car freak 😉 Or not!  He and his father both have a bit of grease monkey in their blood.  Something about a loud engine noise gets them gitty.  The makeover started last year (I like to pretend this project is like a good bottle of wine, that gets better with time) when we painted the walls and installed a barn board accent wall.  I wanted the room to grow with him so we kept to some basic masculine colors that were versatile: Grey-Blue, Deep Red, and Navy was the initial color palette we had selected. Here’s a look at the before version of this room.
Little-d-Tales: Fostering a Creative Life &emdash;

The finer details helped bring this room together.  In fact the vintage car theme didn’t really happen until we attended a local car show and there were several vendors selling what I would call vintage car parts.  For me, going to a car show on a 90+ degree day is exciting as watching turds flush down the toilet, I can find 200 other things that I’d prefer to do.  Seeing that I was being nice, the vendors and their junk made this tolerable and now I have an excuse to go to another one.  If you’re looking for a few car accessories, that here I picked them up (all for about $10) and look how cool they make stuff look….
Little-d-Tales: Fostering a Creative Life &emdash; IMG_9503
(blinker frame) License Plate Word Art

Little-d-Tales: Fostering a Creative Life &emdash; IMG_9511
(Manual Window knobs) Hooks

Little-d-Tales: Fostering a Creative Life &emdash;
(Door Handle) night stand hardware

Little-d-Tales: Fostering a Creative Life &emdash; IMG_9506
(Emblems) Wall Art

Little-d-Tales: Fostering a Creative Life &emdash; IMG_9505
(License Plate) Wall Art

All of these little things helped bring the room together. We happen to have a friend who owns a 1971 Pontiac Le Mans, who was kind enough to let me do a photography shoot to create some custom artwork for the room. There are 4 profile poster prints of the car (Rear profile,  Driver side emblem, Full profile, and the dashboard).  I also added a few of my husbands model cars that he put together as a kid.

Between my husband and I we created or repurposed nearly EVERYTHING.  The barn board accent wall was installed last winter break. Little-d-Tales: Fostering a Creative Life &emdash;

The dresser was the next project,
Little-d-Tales: Fostering a Creative Life &emdash;
repurposed Craigslist dresser with a DIY chalk paint.  Apparently the day I revealed the dresser, I spent the next 3 days doing laundry with the looks of that hamper!  Either way, I managed to complete the clip on curtains,
Little-d-Tales: Fostering a Creative Life &emdash;
and open concept book shelves. Then I had a baby, and seeing how there was nothing that would cause great bodily harm, this was where the room stalled for about 3 months.
Little-d-Tales: Fostering a Creative Life &emdash;

Little-d-Tales: Fostering a Creative Life &emdash;

I recovered a lamp shade to fit with the style of the room, and eventually made the rest of the lamp to match. Both set on top of a Anna White inspired night stand.

square lampshade makeover

Little-d-Tales: Fostering a Creative Life &emdash; IMG_9515

I turned a basic craft store crate into a wall locker by adding a few shelves and a layer of paint, which held some fun collectible materials and the new navy “C” which was reincarnated from his baby room.

Little-d-Tales: Fostering a Creative Life &emdash; IMG_9506

Little-d-Tales: Fostering a Creative Life &emdash; IMG_9505

The “hang out” sign combined the barn board with retro car paraphernalia to be a functional hook for towels mostly, but occasionally a jacket or sweatshirt.  I like to pretend that if I create cool hooks that my kids will actually hang something up.  Ha, a girl can dream, and make something neat along the way 🙂

Finally I created a padded drop cloth and nail head trimmed head-board.  Amazing what my husbands left over roofing nails can do.
Little-d-Tales: Fostering a Creative Life &emdash; IMG_9517

Little-d-Tales: Fostering a Creative Life &emdash; IMG_9520

Little-d-Tales: Fostering a Creative Life &emdash; IMG_9513

The bedding was one of the few things I bought and left as is, thanks to Target.  I enjoy hanging out in little man’s room so much that usually I lay reading him books and snuggle with him.  Then I get all jealous that he has a cool room while mine is all frumpy and cluttered.

So what do you think.  Any tutorials you want first?

Linking to: The Creative Girl, Keeping it Simple, Sumo’s sweet stuff, Craft-O-Maniac, Not Just a Housewife, Home Stories A to Z, Salt Tree

4 Comments

Filed under Uncategorized

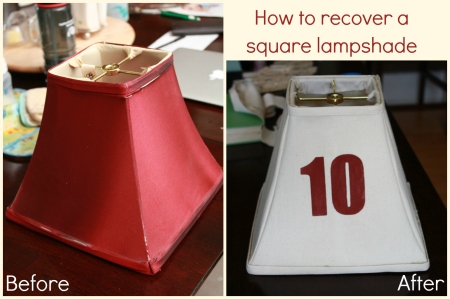
Square lampshade redo

In my quest to finish my little man’s big boy room, I decided to add a few more projects to the list.  One was a new lamp that was more fitting with the rest of the room.  This idea started when I saw this lamp shade at a thrift store for $3 and a recollection of the 20,000  tutorials to recover a lampshade. Interestingly I never found a tutorial for a square lampshade, so here’s my stab at it!

While I pulled some ideas from a few of them, I followed the tutorial from shanty 2 chic the most.

I started by cutting down a seam and then carefully removing the outside layer of fabric (Keep the liner on). Try to keep the fabric all in one piece as that will be your template for your new fabric.  Good thing I read the tutorial before attempting this, because I’m totally that girl who just rips everything apart and then tries to figure it out later.  You’ll end up with just the lampshade skeleton

Because my lampshade was square, and my fabric didn’t have much give to it.  I ended up cutting 4 pieces and sewing the edges together.  This was different from all the other tutorials I had seen. I added 1/2″ of extra fabric all around my previous fabric template before cutting it out. Then just ran a stitch connecting all 4 sides. I trimmed the excess fabric off about a 1/4″ from the seam to make it less bulky and allow it to look more smooth.

Place the new fabric over your lampshade skeleton. (sorry for the bad lighting.  Some project are done best at midnight!)

I used my cameo to add an acrylic barn red-painted stencil of the number “10” to coordinate with my little man’s decor and vintage car theme. I was afraid that it would have been too hard to paint this once the fabric was on the lampshade, so I chose to do it before.  I don’t know if I would bother doing it that way again.

I placed the new lampshade over the skeleton.  Using E-6000 and clothespins I stretched the fabric, glued with e-6000 and held in place with clothespins.  Oh I should mention that I cut all the corners at a diagonal (essentially cutting the bottom corner off) to make the fold over and gluing much easier and again to make sure it laid smoothly on the lamp shade.  I clipped the top of one side with clothespins to hold it in place, then glued and clipped the bottom.  I did each side then waited a few minutes before moving to the next side.  I did all 4 sides on the bottom of the lamp shade before tackling the top.

To finish it off I added my own DIY bias tape to the top and bottom of the shade using excess fabric cut into strips long enough to wrap around the bottom and top of your shade.  Fold over a side and iron, then fold over the other side iron.  Wrap around the bottom of the shade and use e-6000 to glue on.

This little project inspired me to make my own lamp, and night stand too.  Stay tuned, you might even see little man’s vintage care themed bedroom reveal yet this summer?!

1 Comment

Filed under Before/After, DIY Projects, Gift of Thrift, Tutorials

Frozen Sweet Tarts

We are not accustomed to hot and humid weather in Wisconsin.  Usually we are complaining that it’s too cold, and summer goes by too fast.  Today we had heat indexes of 105 degrees.  It’s so hot no one seems to even want to eat…that is until I made this refreshing treat.

Frozen Sweet Tarts

They are made with 4 ingredients and take 5 minutes to whip together.  Ready?

Ingredients:
Frozen Yogurt (half of a quart…which would be a pint right?)
Frozen Juice (I used pink lemonade) 1 container
Cool Whip 1-8 oz container
Nilla Wafers

Set out the frozen yogurt and frozen juice on the counter until the sides are slightly melted and in the middle is somewhat soft.  Combine the frozen juice and frozen yogurt in a large mixing bowl.  Whip with mixer.  Add container of Cool Whip.  Continue mixing until smooth and creamy. Line a muffin tin with cupcake liners (I used the mini’s to make bite sized treats). Place a Nilla Wafer on the bottom of each cupcake liner, flat side down.

Place a heaping spoonful of the sweet tart mixture on top of the Nilla wafer until the cupcake tin is nearly full.  Place in the freezer for about an hour. *Note you can garnish with fresh fruit, but if you put the fruit on before placing in the freezer the fruit freezes and makes it harder to eat.  I suggest adding fresh fruit just before eating

When they are ready you simply open the freezer, grab a frozen sweet tart and pop it in your mouth.  They are such a refreshing treat.  They somehow revitalized my wilting family.  Just don’t let them sit out of the freezer too long, they will melt which makes it a little trickier to eat 😉

Linking to:
Funky Junk Interiors,

2 Comments

Filed under DIY Projects, Real Life

How to decorate with Red, White & Blue

In honor of America’s birthday, I thought I’d be a little festive. The vignettes are easy and fun, however the above the cupboard space always proves to be more challenging than you think. I thought I’d share some tips and tricks on how to decorate these spaces with simplicity using art principles and a whole lot of thrift! (Sorry if that isn’t grammatically correct, it’s a phrase commonly used in my neck of the woods)

Side table Vignette: Just a touch of Red, White and Blue and chalkboard word art with some from the Star-Spangled banner to take the stage.

I free-handed the phrase with the help of some old-fashion white chalk and one of my many repurposed picture frames turn chalk board.

Add some country garland, a metal canister on one side (courtesy of IKEA) and a Vintage Blue Bottle on the other and we have ourselves a simple table vignette to celebrate America.

Above the cupboards {Grr, insert frustration here}.  When we bought this house I loved the idea of having the space above the cupboard to decorate for the seasons.  Sometimes I wish I could just leave the same decor up year round, but I simply can’t.  It bothers me to walk into our house and see the same old thing all the time.  It’s like a bad habit, with every change in season I struggle over how to change it up.  There is almost 3 feet of space to deal with, keep in mind the top of cupboards with trim covers nearly 4 inches of the bottom. This means I need to find ways to prop things up with 2 x 4 remnants, and also make sure to include big stuff.  The name of the game, I’ve learned,  is layers and angles.

I used to be into store bought decor, hence the FREEDOM word art from Hobby Lobby.  I have since tried to use only repurposed items and be a little more creative in my decorating to make or reuse items in a different way. The 7-Up crate you have or will see in 42 other pictures.  I use it ALL THE TIME ( sorry didn’t mean to yell, I just really love my old crates).  The candles were a DIY project from my Christmas Collection of projects. The flag pillow was a rummage sale item for 25 cents and the grapevine was cut several years ago from my parents back yard and has been used in various locations including the swag above our wedding arbor. Notice the layers of items overlapping, this help create more contrast and depth to the decor making it more appealing to the eye.  The grapevine acts as a filler without taking over the decor.

It’s also hard to get pictures of “Above the Cupboard decor” so bear with these next couple shots.  From this angle you can see the angles that I used to add some depth and provide focal points.  The angled stars in either corner (3 for a $1 at rummage sale) help draw your eye to the center.  The square red tin behind the lone little start stand help create some contrast and make the little star POP out.  The dark blue bowl (another $1 rummage sale find) grounds the decor with a different height from the other pieces.  Now a straighter but darker image

ALthough it’s challenging space to work with, using  pieces of various sizes and providing some layers of texture and angles for depth you can easily pull together an Above the Cupboard space to honor America 🙂

Linking these parties:
The Kurtz Corner, Home Stories A to Z, Not Just a Housewife, Elizabeth & Co, The Salt Tree


Leave a comment

Filed under DIY Projects, Gift of Thrift, Repurpose

Bloom into Summer

I CANNOT believe we are rounding out  June this week.  I guess it’s time to take down the Easter decor then huh!?! (no worries, I took it down 2 weeks ago)

I might be the world’s worst gardener.  My thumbs are brown, however I happen to have a husband that manages to keep things alive so I’ll give him full credit for the blooms in our yard.

Purple Iris’ nearly 3 feet tall!

The azalea decided to bloom again after a few dormant summers.


I have no recollection of what these are …any one want to help a friend by identifying these pretty purplish perennial.  I planted from seed several years ago and they are the one happy dance I do every spring.

And the Pink Peony that never last long enough.  Because I feel like these take forever to burst into an amazing bloom, I captured the stage from bud to bloom.

Now that summer is in full bloom, I’ll be returning to my full-time job and life will be insane at least until mid-august at work.  I’m hoping to offer a post at least 2-3 times a week.  Based on my track second that isn’t always realistic, but I will try 🙂


Leave a comment

Filed under Photography, Real Life

Return from paradise

image

We just returned from a cabin on the shores of lake Superior. The husband and I woke each morning at 5 am to a cup of jo and this view. (Confession: we were usually back in bed by 5:45 am). It was a splendid time spent completely unplugged enjoying our time as a a family of 4. If you want to see the instagram version of our life…feel free to follow me at littledtales.

Leave a comment

Filed under Inspiration, Photography

Not JUST a coffee table

When I met my husband, he was in transition from the other side of the state to where we live now.  He was in the process of creating this amazing piece that currently resides in our basement.

She is made out of  Walnut, with tile inlay for the top.

Isn’t she amazingly gorgeous?!  It is one of my favorite of my handy husbands many projects.

Again, my husband is not a blogger so of course there are no pictures of the process, but if you are interested in making one of these for yourself, shoot me an email and I’ll have him pull the plans out of his brain and share them with you.

This concludes the “handy” husband series honoring my husbands work.  He truly is an awesome ma who supports my creative juices or helps out around the house or by taking the kids so I can work on one of my many projects!

Leave a comment

Filed under DIY Projects, Handyman

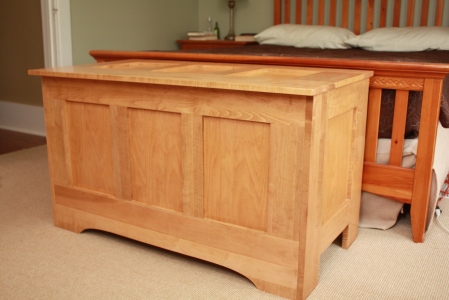
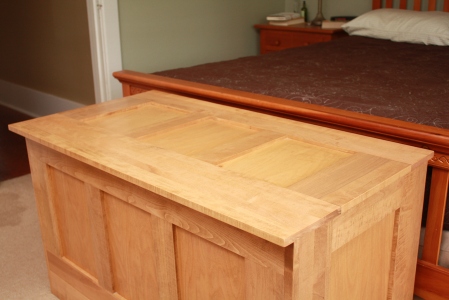
Hope Chest

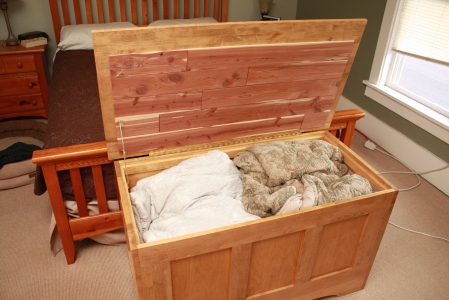
I think was one of my first furniture requests to my husband after we were married.  We have a TON of blankets and quilts for the various different sized beds in our home, without a good place to store them that don’t take up precious closet space.

We had some spare space at the end of our bed to house this beauty.

To my surprise she is lined with cedar to make everything smell fresh, which brings back so many memories of my grandparents and their cedar closet.

(Please stop judging our master bedroom.  It’s slated for a makeover, just trying to finish one of the other 3 rooms in limbo right now).

The husband truly has an eye for putting my vision into a reality.  Thanks to my “handy” husband for yet another project.  Stay tuned tomorrow you’ll see one of my FAVORITE pieces yet!

1 Comment

Filed under DIY Projects, Handyman